Usability Testing
Make the right design decisions by testing with users throughout the product development lifecycle.
What is Usability Testing?
Usability testing is a method to see how easy to use a software application is; by testing it with real users. It allows researchers to uncover any problems with their product’s user experience, decide how to fix these problems, and determine whether the product is usable enough.
Can detect about 90% of UX-related issues by performing usability tests on a group of 5 users. To conduct usability testing we just need to find minimum 5 real users who are willing to spend their time and come forward to test the design.
The important thing we have to tell the user before using is not to take any kind of pressure i.e. it is not a test of their technical skill but of the design, and thinks everything out loud because that will give us much better insight.
Benefits of usability testing

Identify problems
Uncover issues with the design of your digital product.

Discover opportunities
Reveal improvements that can be made to your product.

Know your users
Make sure you’re addressing your users’ wants and needs.
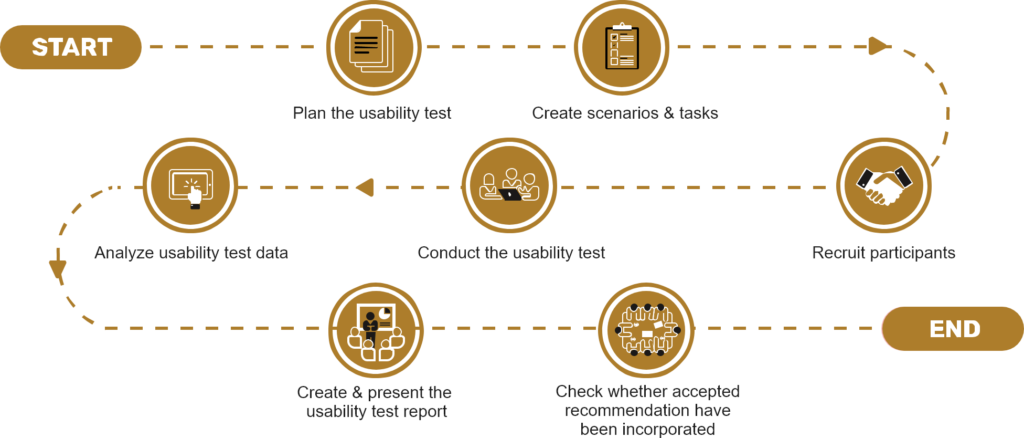
How usability testing is conducted?
Step 1 – Define Goal
- Purpose of the test: On which areas of your website do you want to focus and what will benefit most from usability testing?
- Define your audience: Generally, these are representative of your user persona, but you may want to provide more specific information about a specific segment.
- Questions you want to ask: What specific questions do you want to ask users about your product or what are you trying to find out?
Step 2 – Create Tasks and a discussion guide
- What does it means: You are going to carefully plan the specific scenarios in which you will take your participants, and the tasks your participants will need to complete in order to guarantee clear and actionable results. Els does this by writing a specific scenario that provides a context for the test tasks. For example, let’s say you’re testing a dental clinic app that manager your clinic’s inventory and appointments.
Step 3 – Recruit Participants
- How and Whom you recruit, depends on your testing goals. I.e., how much information you need and therefore how long your sessions should be, and your budgetary constraints.
Step 4 – Set up the Environments
- Set up a room or set up a screen share, depending on whether you’re doing it: in-person or remotely. Record a user’s screen session on Mac, Morae, or GoToMeeting.
Step 5 – Moderate the sessions
- When it’s time to conduct the usability testing session, you or your moderators should follow a set protocol with each participant. This protocol leaves some room for customization but still guarantees an overall standardized experience for each test subject.
Step 6 – Analyze the Data
- Finally, after gathering all your data, it’s time to analyze the results and draw conclusions. Try to do it as soon as possible after the test so that the observations are fresh in your mind.
- As you go over the data, users will encounter the most serious or persistent problems that deserve further investigation. We use a color-coded system to group similar situations together.
Step 7 – Create and present a usability test report
- Usability study reports are an effective way of summarizing results to share with stakeholders.
Step 8 – Check whether accepted recommendations have been incorporated


FAQs
Subscribe to Our Newsletter
About Intelligence Support for Senior Executives